How To Put B12 Injection How to Give B12 Injections at Home to Yourself · PA Relief
Introduction
If you’re living with B12 deficiency, knowing how to put b12 injection at home can feel like a mix of relief and anxiety—especially when you’re tired, the needles are unfamiliar, or you don’t want to make a mistake. In my hands-on work supporting people who administer their own injections, the biggest “pain point” I hear is not the injection itself—it’s uncertainty: which site to use, how to reduce bruising, what to do if you hit a bad spot, and how to stay consistent week to week. This guide walks you through the process in a practical, safety-first way, so you can approach home injections with confidence and clear technique.
Before You Start: Confirm You’re a Candidate for Home Injections
Before I ever help someone with technique, I make sure the plan is medically appropriate. Home injections aren’t right for everyone, and the right “how” depends on your prescription and your clinician’s instructions.
What to verify with your prescriber
- Medication and strength: vitamin B12 formulation (commonly cyanocobalamin or hydroxocobalamin) and the dose in your prescription.
- Needle/syringe type: gauge and length can affect comfort and accuracy.
- Injection route: many regimens use intramuscular (IM) injections; some plans use subcutaneous (SC). Technique differs.
- Injection schedule: how often you inject, and whether there are loading-dose phases.
- Where to inject: which sites your clinician recommends for your body type and regimen.
When you should not self-administer
In my experience, people do best when they can pause and get help if anything feels off. Avoid home injection and contact your clinician urgently if you have:
- Unclear instructions about injection route or dose
- Active infection at the injection site
- Severe bleeding disorders, uncontrolled anticoagulation issues, or unstable health conditions that increase risk
- Severe needle phobia that makes safe, steady technique unlikely
Injection Sites for B12: How to Choose and Prepare
The biggest technique win for comfort and consistency is correct site selection. When I’ve trained individuals, the learning curve drops sharply once they understand why each site exists and how anatomy affects absorption.
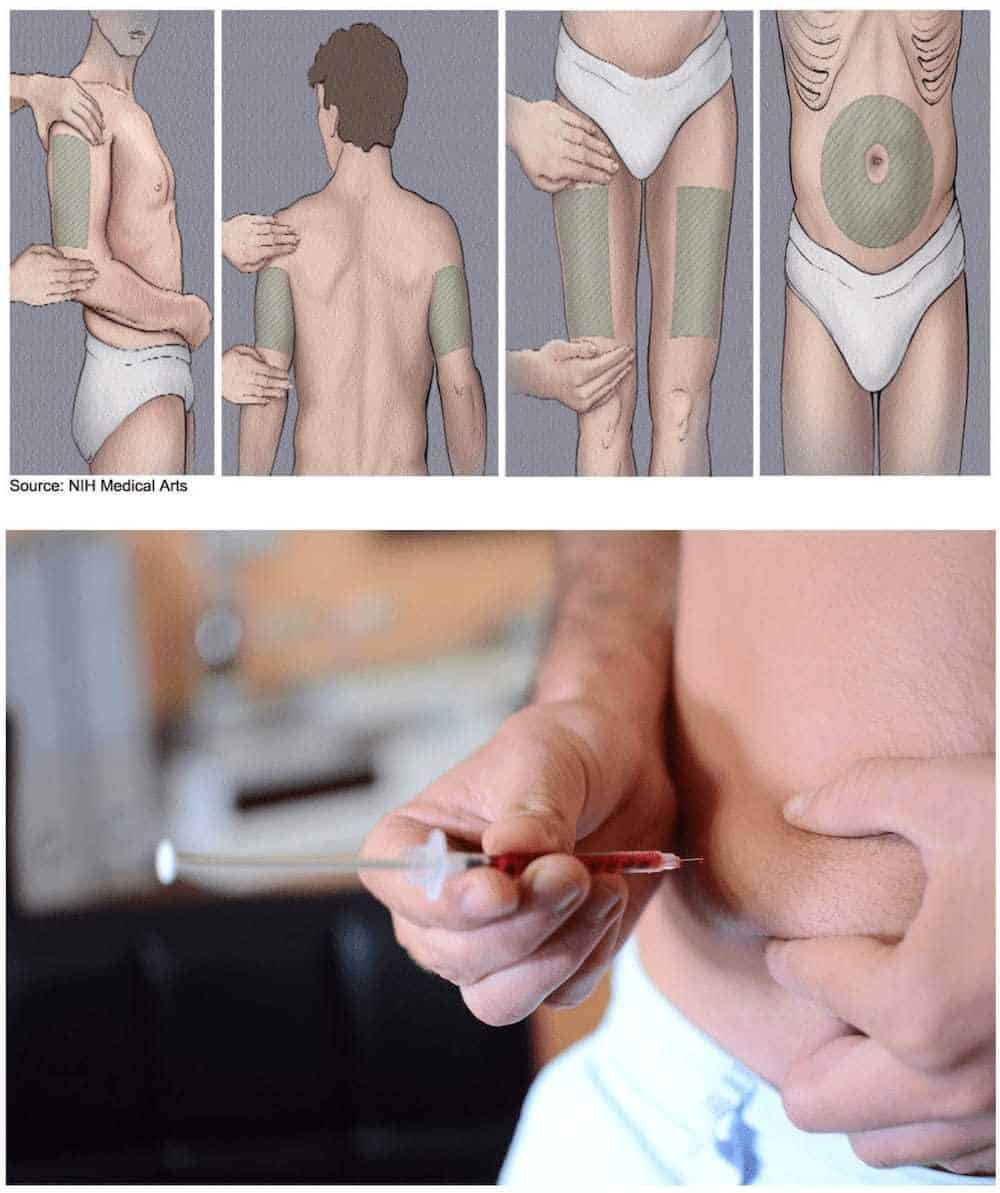
Common B12 injection sites
- Upper outer buttock (ventrogluteal area) or gluteal region: often used for IM injections.
- Thigh (vastus lateralis): frequently used for IM or SC depending on your plan and needle length.
- Outer upper arm (deltoid): sometimes used for IM injections; smaller volume tolerance is common.
Why correct site matters
Choosing the right location reduces the chance of hitting sensitive structures and can improve how the body absorbs the medication. If you inject too high or too medial in a gluteal area, you increase risk. If you inject too superficially for an IM plan, absorption can become less reliable and you may feel “off” after doses.
Image reference: B12 injection sites
Step-by-Step: How to Put B12 Injection at Home (Technique Overview)
Below is a technique framework used in many training sessions. Still, your prescriber’s instructions come first—especially for whether your injection is IM vs SC, the needle choice, and the prescribed dose.
What you’ll need
- Prescribed B12 medication (vial or prefilled syringe)
- Correct syringe and needle (if not prefilled)
- Alcohol swabs (or other clinician-approved antiseptic)
- Clean gauze or cotton
- Sharps container (puncture-proof) for immediate disposal
- Gloves (optional, but useful if you prefer a barrier)
- A timer or a consistent checklist (helps reduce missed steps)
1) Set up your workspace
I recommend using a clean, uncluttered surface so you’re not searching mid-procedure. In my hands-on training, people who do a 60-second setup before opening anything consistently make fewer mistakes.
- Wash hands with soap and water.
- Lay out supplies within arm’s reach.
- Check the medication label for correct drug, dose, and expiration.
2) Check the medication
- If it’s a vial, follow your prescription’s instructions for drawing up the correct dose.
- If using a prefilled syringe, confirm the dose and expiry date.
- Inspect the liquid: do not use if there are unexpected particles or changes in appearance (unless your clinician has told you otherwise).
3) Choose the injection site and disinfect
- Rotate sites as advised to reduce scar tissue and repeated irritation.
- Clean the skin with an alcohol swab and let it air dry. Don’t “re-touch” the cleaned area afterward.
4) Position and stabilize
Stability is the difference between a smooth injection and a stressful one. I’ve seen “harder” technique come from poor positioning, not from the syringe.
- Use a position that keeps the muscle relaxed.
- If injecting into a muscle, keep the area loose rather than tense.
- For thinner skin areas (like deltoid), be especially mindful of your clinician’s route instructions.
5) Insert the needle using the correct IM vs SC approach
This is where route accuracy matters most.
- IM (intramuscular): needle angle and target tissue depth are intended to reach muscle.
- SC (subcutaneous): needle angle and depth are intended for fatty tissue under the skin.
If you’re not 100% sure whether your plan is IM or SC, pause and confirm with your prescriber before proceeding.
6) Inject the medication steadily
In real-world use, steady injection typically feels better and reduces tissue irritation. Avoid rushing—especially if you’re prone to tightness or shaking.
- Inject as directed by your medication plan (not faster than recommended).
- If you feel unexpected sharp pain, stop and contact your clinician for guidance.
7) Remove the needle and manage the site
- Remove the needle in a smooth motion.
- Apply gentle pressure with gauze. Avoid aggressive rubbing.
8) Dispose safely
- Immediately place the needle and syringe into a sharps container.
- Do not recap unless your clinician’s instructions specifically require it (many modern needle safety designs avoid recapping).
Common Issues I’ve Seen (and How to Reduce Them)
Most “problems” with B12 self-injection are predictable and fixable once you adjust technique and expectations.
Bruising
- What happens: small blood vessel trauma.
- What I’ve found helps: site rotation, correct needle selection/length, and steady insertion with minimal re-aiming.
Pain during or after injection
- What happens: tissue irritation, wrong depth/route, or injecting tense muscle.
- Practical adjustments: relax the muscle, ensure you’ve disinfected and fully dried the area, and confirm route accuracy (IM vs SC).
Difficulty drawing or injecting the dose
- What I’ve seen: technique issues with vial handling or inconsistent air bubble control.
- Fix: ask a nurse to demonstrate your exact medication format (vial vs prefilled syringe) and needle gauge before you do it alone.
When to call your clinician
- Severe or worsening pain
- Spreading redness, warmth, swelling, or fever
- Persistent bleeding that doesn’t improve with pressure
- Allergic symptoms (hives, facial swelling, trouble breathing)
Building a Consistent Routine (So You Don’t Miss Doses)
One of the most important “success factors” in home injections isn’t the needle—it’s adherence. When people create a routine, they miss fewer doses and experience less anxiety.
- Pick a fixed day/time: pair the injection with an existing habit (morning routine, after dinner).
- Keep a B12 kit: store supplies in one place so you’re not scrambling.
- Track your sites: rotate and note where you injected each time.
- Have a backup plan: know who to contact if you can’t safely inject that day.
FAQ
How do I know whether my B12 injection should be IM or SC?
Your prescription and clinician instructions should specify the route. IM and SC use different depth/angle expectations, so confirm with your prescriber if your paperwork doesn’t clearly state it.
What’s the best way to reduce pain when learning how to put b12 injection?
I’ve found the biggest improvements come from relaxing the target muscle, using the correct site, letting the disinfectant air dry, and injecting steadily without repeated “re-aiming.” If pain remains significant, ask for an in-person technique check.
Can I inject into the same spot every time?
It’s usually better to rotate injection sites as advised. Repeated injections in the same location can increase irritation and may affect comfort over time.
Conclusion
Learning how to put b12 injection at home is a skill you can build with the right preparation: confirm IM vs SC with your prescriber, select and disinfect the correct site, insert and inject steadily using the route-appropriate technique, and dispose of sharps safely. In my hands-on experience, confidence grows quickly once you lock in consistency—especially with site rotation and a repeatable checklist.
Next step: Write down your exact dose, route (IM or SC), and recommended injection site locations from your clinician instructions, then schedule one “technique check” (with a nurse or clinician) before your next dose if you haven’t been trained in person.
Discussion